
This DIY diaper cake tutorial should have been written five years ago – when I actually made the diaper cake and when this trend was the most popular. But regardless of whether or not this is a new idea, I still love it and I can’t think of a better gift or centerpiece for a baby shower. I’ve now been involved in throwing a few baby showers, and planning the games is always my favourite part. So I’ve shared a list of my favourite baby shower games as well. I’m sure it will come to no surprise that 2 of the 3 are food related. 😉

How to Make a Diaper Cake
There are several different ways to make a diaper cake and an endless number of ways that you can decorate it. I’ve provided the instructions for how I made my diaper cake, along with a few other options that you may prefer.
Building the Diaper Cake From the Bottom Up
For ease of transport, the diaper cake will need to stand on a large plate, cake board, or cake stand, preferably something you are willing to part with. I used a sturdy, round, silver cardboard cake board. I also placed a piece of anti-slip cupboard liner on the cake board, centered under the bottom cake tier to prevent the diaper cake from slipping off.
Making the Diaper Cake Tiers
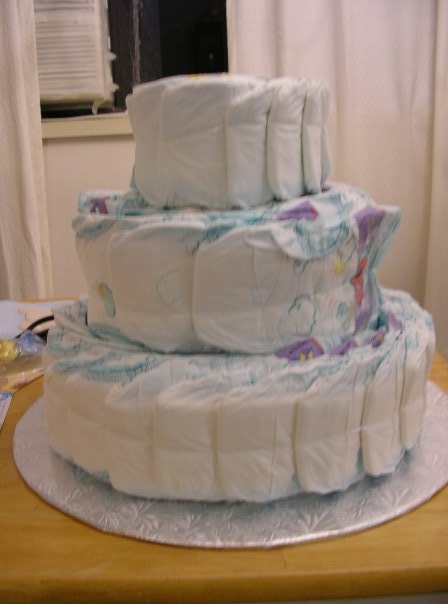
Personally, I like the look of 3-tier diaper cakes the most. But 2-tier diaper cakes look great too. When assembling the cake tiers, it is much easier if you have an extra pair of hands to help you out. I didn’t have help, so I’ve provided instructions for how you, too, can make a diaper cake without assistance. Start by assembling the bottom tier. Then assemble the middle tier, and finish with the top and smallest tier. The number of diapers you will need depends on how many tiers you’re making, how large you want the tiers to be, and the size of the diapers you want to use. You will need approximately 100 diapers for a 3 tier cake. Personally, I prefer to use slightly larger diapers so that the cake tiers look taller. If desired, you could use different sized diapers for different tiers. Just be sure to increase the size of the diapers as you move down the tiers, so that the bottom cake tier is made out of the largest sized diapers and the top tier is made out of the smallest diapers.
How I did it:
To assemble the bottom tier of the diaper cake, stand a tall and round (or roundish) bottle of baby product in the centre of your cake board. Options include a baby bottle, shampoo, lotion, etc. Ideally, the bottle you choose will be tall enough to act as the centre of your second/middle tier as well. Then wrap one diaper, with the length of it running horizontally, all the way around the base of the bottle. Using one hand to hold the first diaper in place around the bottle, use your other hand to pick up the next diaper. Wrap the second diaper around the first diaper and bottle. Make sure that the second diaper overlaps the first diaper and is offset by about an inch. Repeat with the remaining diapers until the bottom tier is as large as you want it to be. Keep in mind that the other tiers will get smaller and smaller, so the bottom tier needs to be large enough for your smallest tier to be substantial in scale. If you have someone to help you, they can hold the diapers in place as you add more to the cake tier. But I made the diaper cake by myself, so when the tier became too big to hold together with just one hand, I used two large, heavy objects to brace opposite ends of the diaper cake. These heavy objects, such as cast iron pots, held the diapers together the way that an extra pair of hands would have. As I worked, I would use one hand to temporarily replace one of the heavy objects, use the other hand to add a new diaper to the cake tier, and then return the heavy object to its place to hold the diapers together.
When your bottom tier is done, wrap a large rubber band around the tier to keep the diapers together. If you do not have a rubber band that is large enough for your cake tier, tie a piece of string or twine around it instead. Don’t worry, the rubber band and string will be hidden by decorations later.

Another option:
There is another method for assembling diaper cake tiers that you might want to consider using. This alternative does not require a bottle of product to be placed in the centre, and it is much easier to do if you are making this diaper cake by yourself. However, you will need 2 or 3 different sized round cake pans. I did not use this method, because I did not own a cake pan that was large enough to make the bottom tier of my diaper cake and because I like the idea of having a surprise gift inside the diaper cake for the parents. See the video tutorial here.
Repeat the steps above to make your second and third tiers. If you are using the same method that I used, then build the second/middle tier directly onto the bottom tier. Make the third/top tier separately. If you are using the alternative method, build the second and third tier separately.

Assembling and Decorating the Diaper Cake
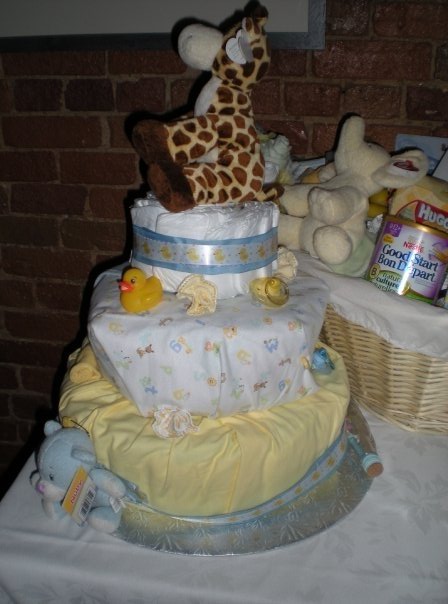
When you are ready to assemble the cake, you should have at least the bottom tier already sitting on (and centered on) an anti-slip cupboard liner atop a cake board. Before assembling the rest of the diaper cake, take into consideration how you would like to decorate it. For example, if you would like to wrap a cake tier in a receiving blanket (to make it look like an icing or fondant covered cake tier), you should do so prior to assembling the cake. Personally, I recommend leaving at least one cake tier unwrapped or partially unwrapped, so that people can see the diapers.
Then, simply stack the remaining cake tiers on top of, and centered on, the bottom cake tier. The top tier should be the smallest in diameter and the bottom tier should be the largest. The last step is to decorate the diaper cake.

Wrap wide decorative ribbon around your cake tiers to hide the rubber band and/or string.
Add a topper to your cake. Stuffed animals, booties, rattles, or rubber ducks make great cake toppers (I’ve seen rubber duckies that act as bath water thermometers). Instead of using a cake topper, you could wrap a stuffed animal around the side of the cake and position it so that the animal is hugging the cake.
Add an assortment of useful accessories to the cake by resting them on the edge of cake tiers, taping them down to the edge of the cake board, tucking them in between layers of diapers, pinning or tying them to the decorative ribbon, or slipping them in between cake tiers and allowing them to hang over the side of the cake. For example, you could decorate the cake with bibs, socks (you can fold the socks to look like roses), booties, newborn mittens, wash cloths, pacifiers, teething toys, mini books, rattles, mini rubber ducks, mini bottles of baby products or creams, etc.

Favourite Baby Shower Games
I love planning party games and these are my favourite baby shower games. I have used them for all girls and for mixed gender baby showers. These games are always a huge hit.
- This game has people guessing what the baby ate from looking at disgusting/delicious ‘poop’. Buy some diapers and 3 to 5 different types of chocolate bars. Place one chocolate bar into each diaper and use the microwave to melt the chocolate bars. Then have people guess what the baby ate.
- This game has people tasting baby food and trying to figure out what they’re eating. Buy several different jars of baby food. Choose a fruit puree, a vegetable puree, and some less appetizing pureed meals such as beef and pasta, turkey dinner, chicken casserole, etc. Remove all of the jar labels and provide many tasting spoons. See if your guests can tell what they’re eating.
- This game will have you hosting the diaper changing Olympics. Set up two tables for your diaper changing stations at one end of a long room or backyard. Each table should have a plastic baby doll that is wearing a diaper, additional diapers, Vaseline, and baby wipes. Divide your guests into two teams and have them line up on the opposite end of the room or backyard. Each team will have to run a relay. The first player runs to the changing station, removes the baby’s diaper, wipes the baby’s bum, applies Vaseline, and puts a new diaper on. He/she then carries the baby back to his/her team and hands the baby to the next team mate in line. That team mate must then run to the changing station and repeat what the first player did. This continues until everyone on each team has completed the challenge. First team to complete the challenge wins the game.
