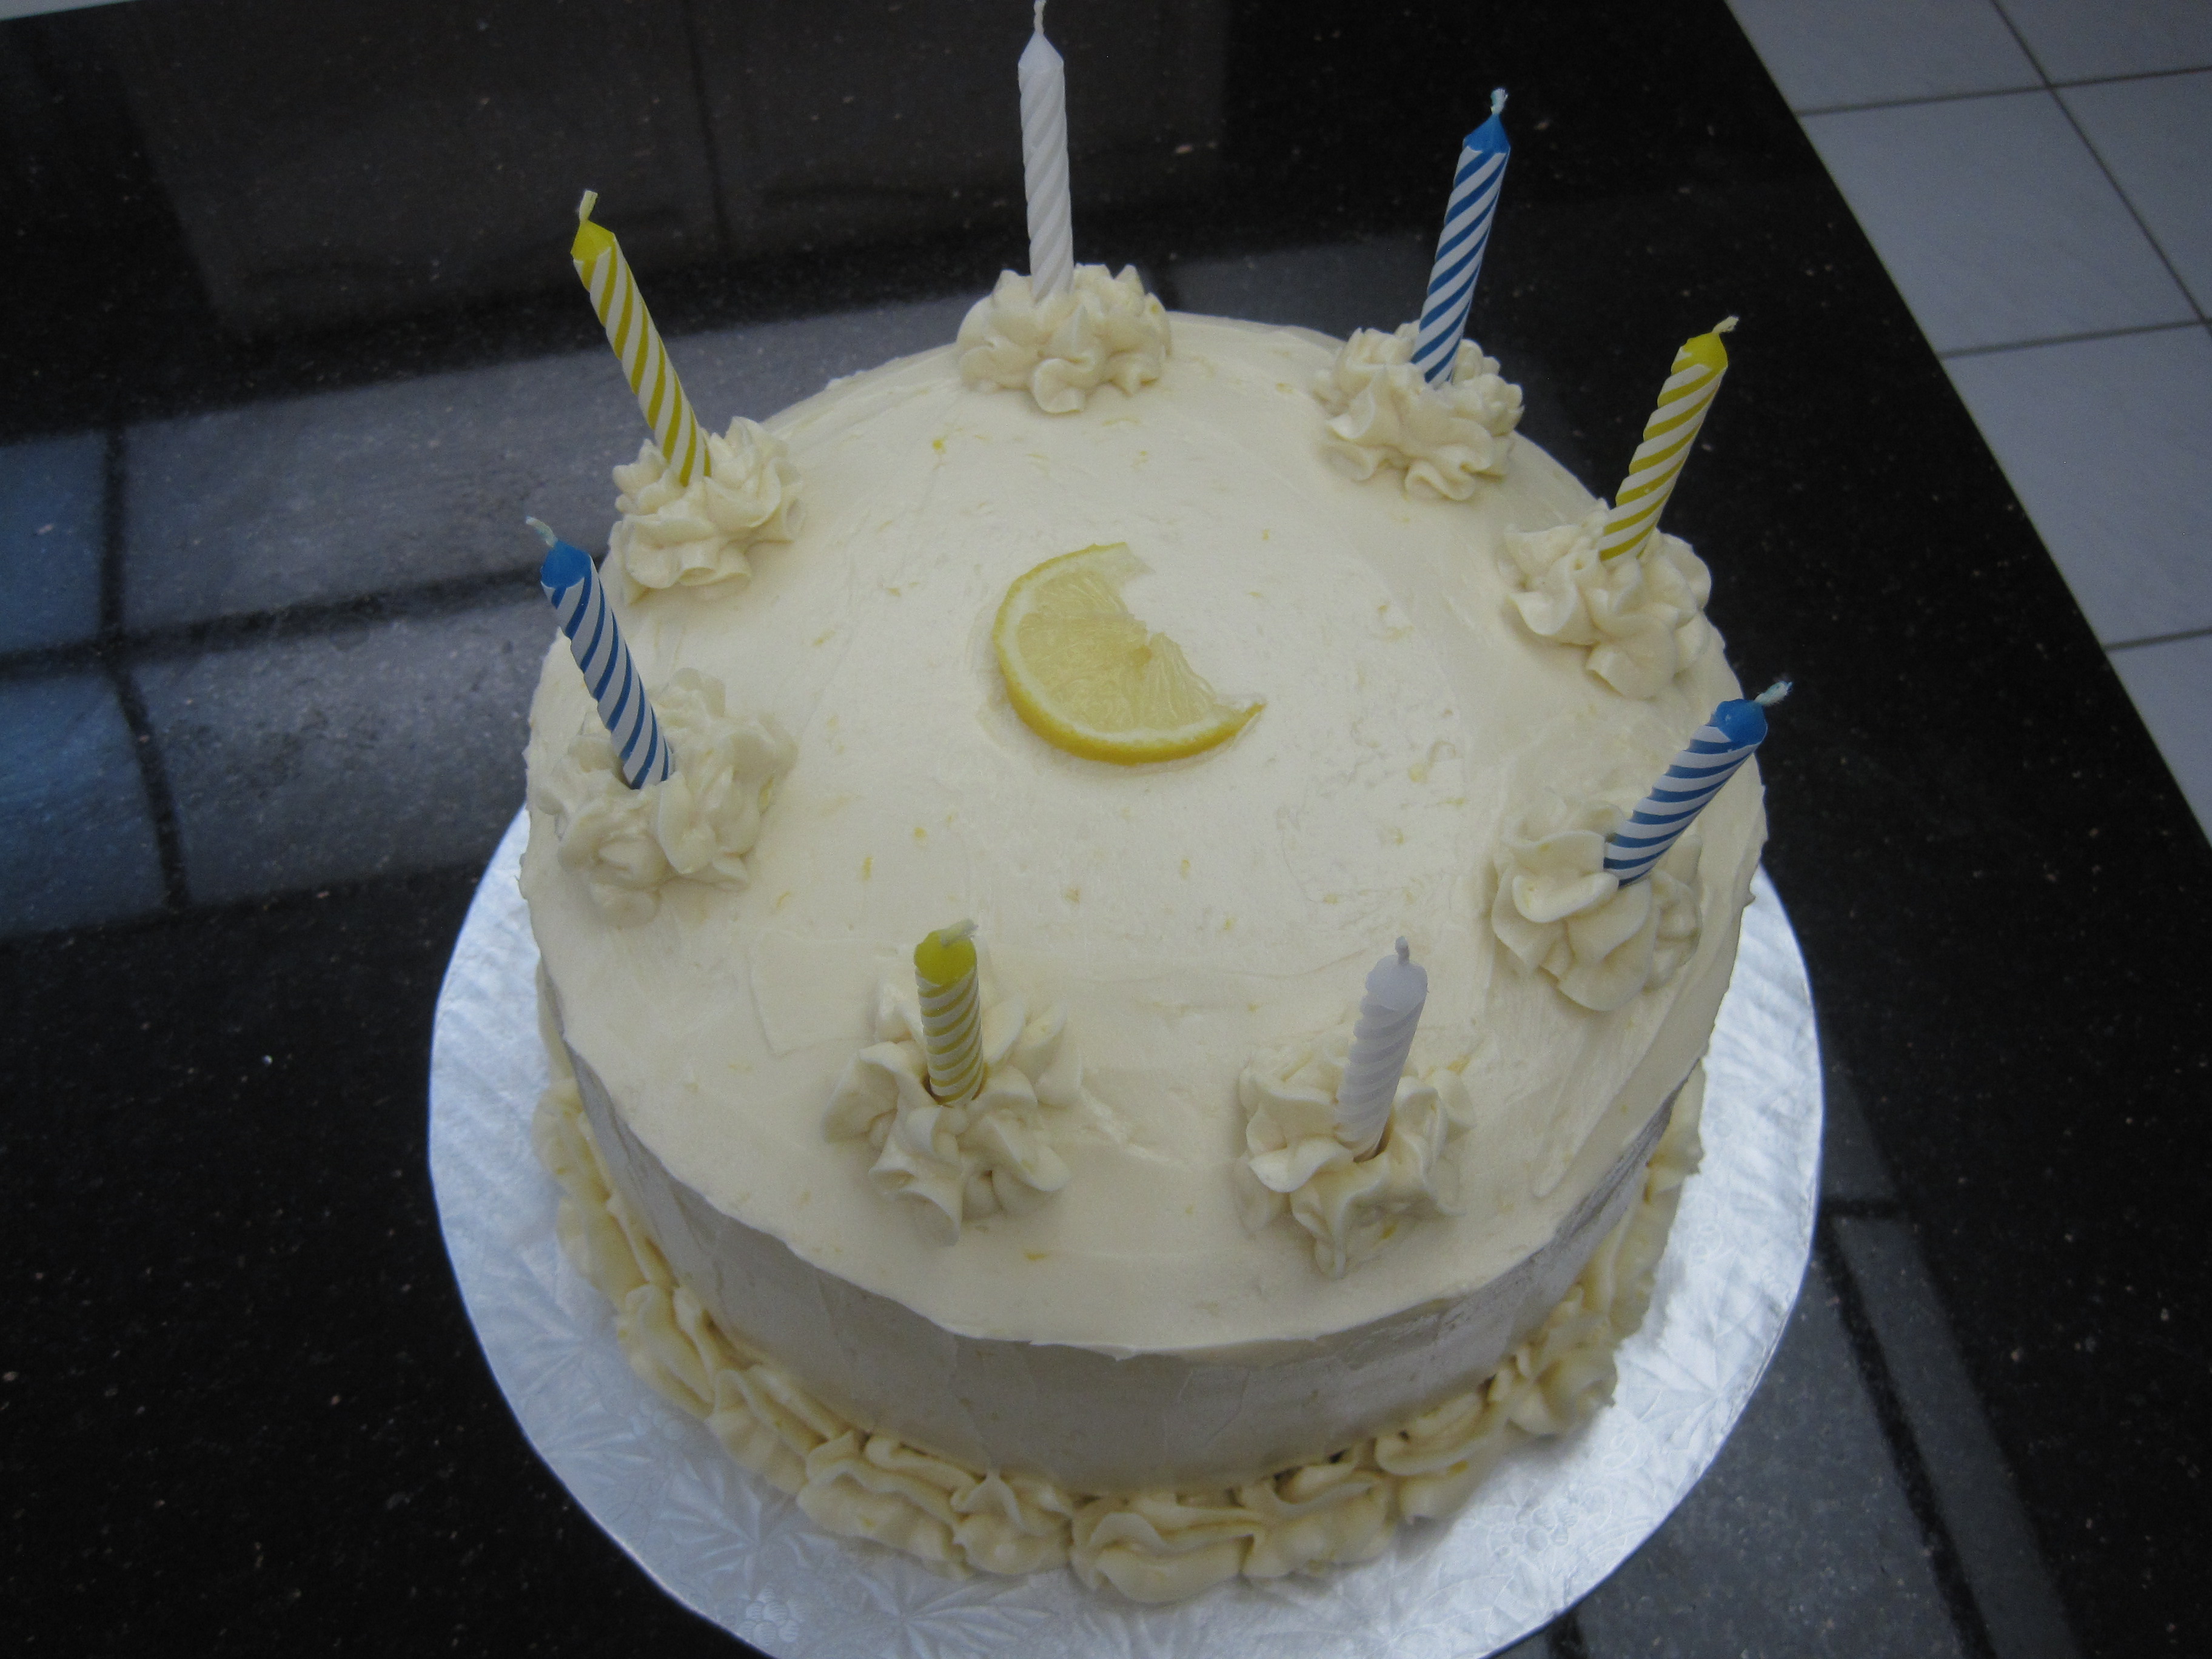
Although this may be the ugliest cake I’ve ever made, it is the best lemon layer cake that I have ever 1. eaten and 2. made. This triple-lemon cake consists of four layers of cake, two layers of lemon curd, one layer of whipped cream and fresh blueberries, and a covering of whipped frosting. There is lemon in the frosting, the cake layers, and, of course, the lemon curd filling. I know it sounds like a lot of work, but many of the components can be made days in advance and it truly is worth it.
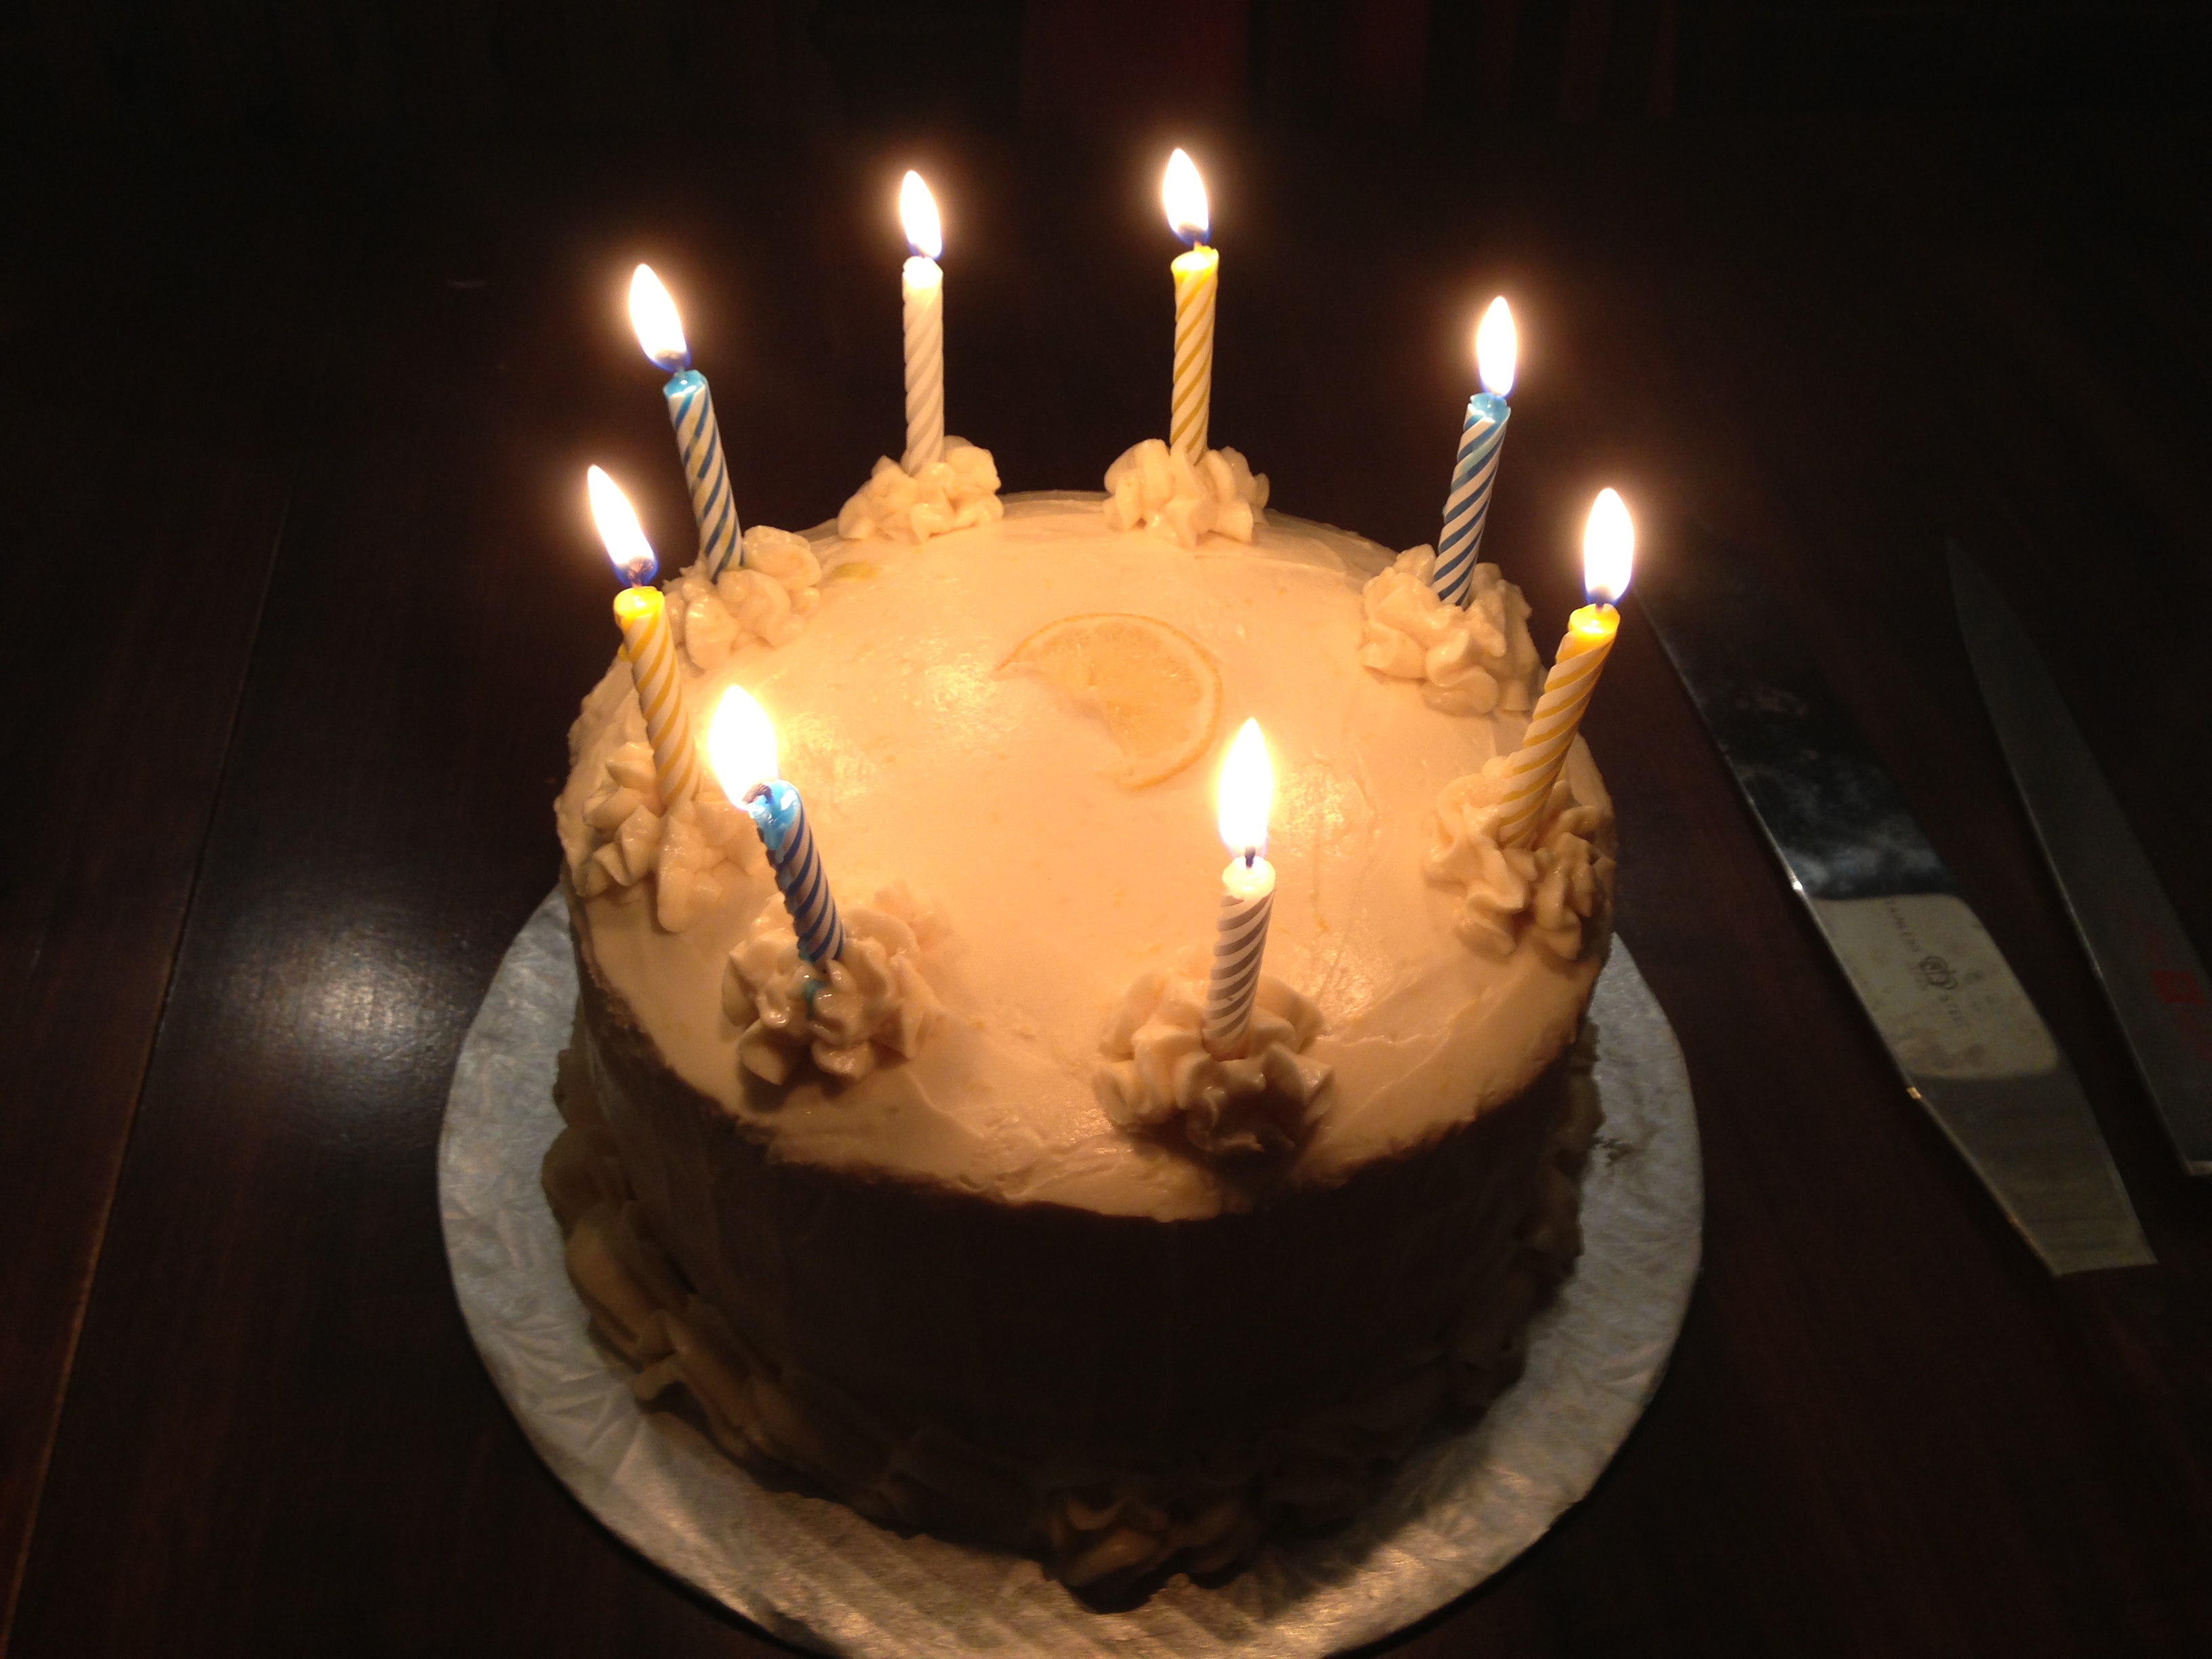
In my opinion, these cake layers have the best texture you could ask for in a vanilla/white/yellow cake. They are soft, fluffy and moist, substantial in density yet not too heavy, and similar to but better than boxed cake mix. As a whole, this cake is perfectly balanced. Firstly, the lemon curd lends the most wonderfully bold lemon flavour which lightens up the entire cake. Then the whipped frosting adds a richness that isn’t too heavy, and just enough sweetness to balance the tangy lemon curd. The middle layer of filling is light and fresh with barely sweetened whipped cream and fresh blueberries. I made this cake for John’s 30th birthday dinner and even non-cake lovers helped themselves to second and third slices. My brother, who rarely eats cake, ate two large slices of it. I was shocked! Even John’s mother, who always finds cakes to be too sweet or too rich, really liked this one. And my mother, who has had a complaint about every single cake I’ve ever made, complimented this cake for days.
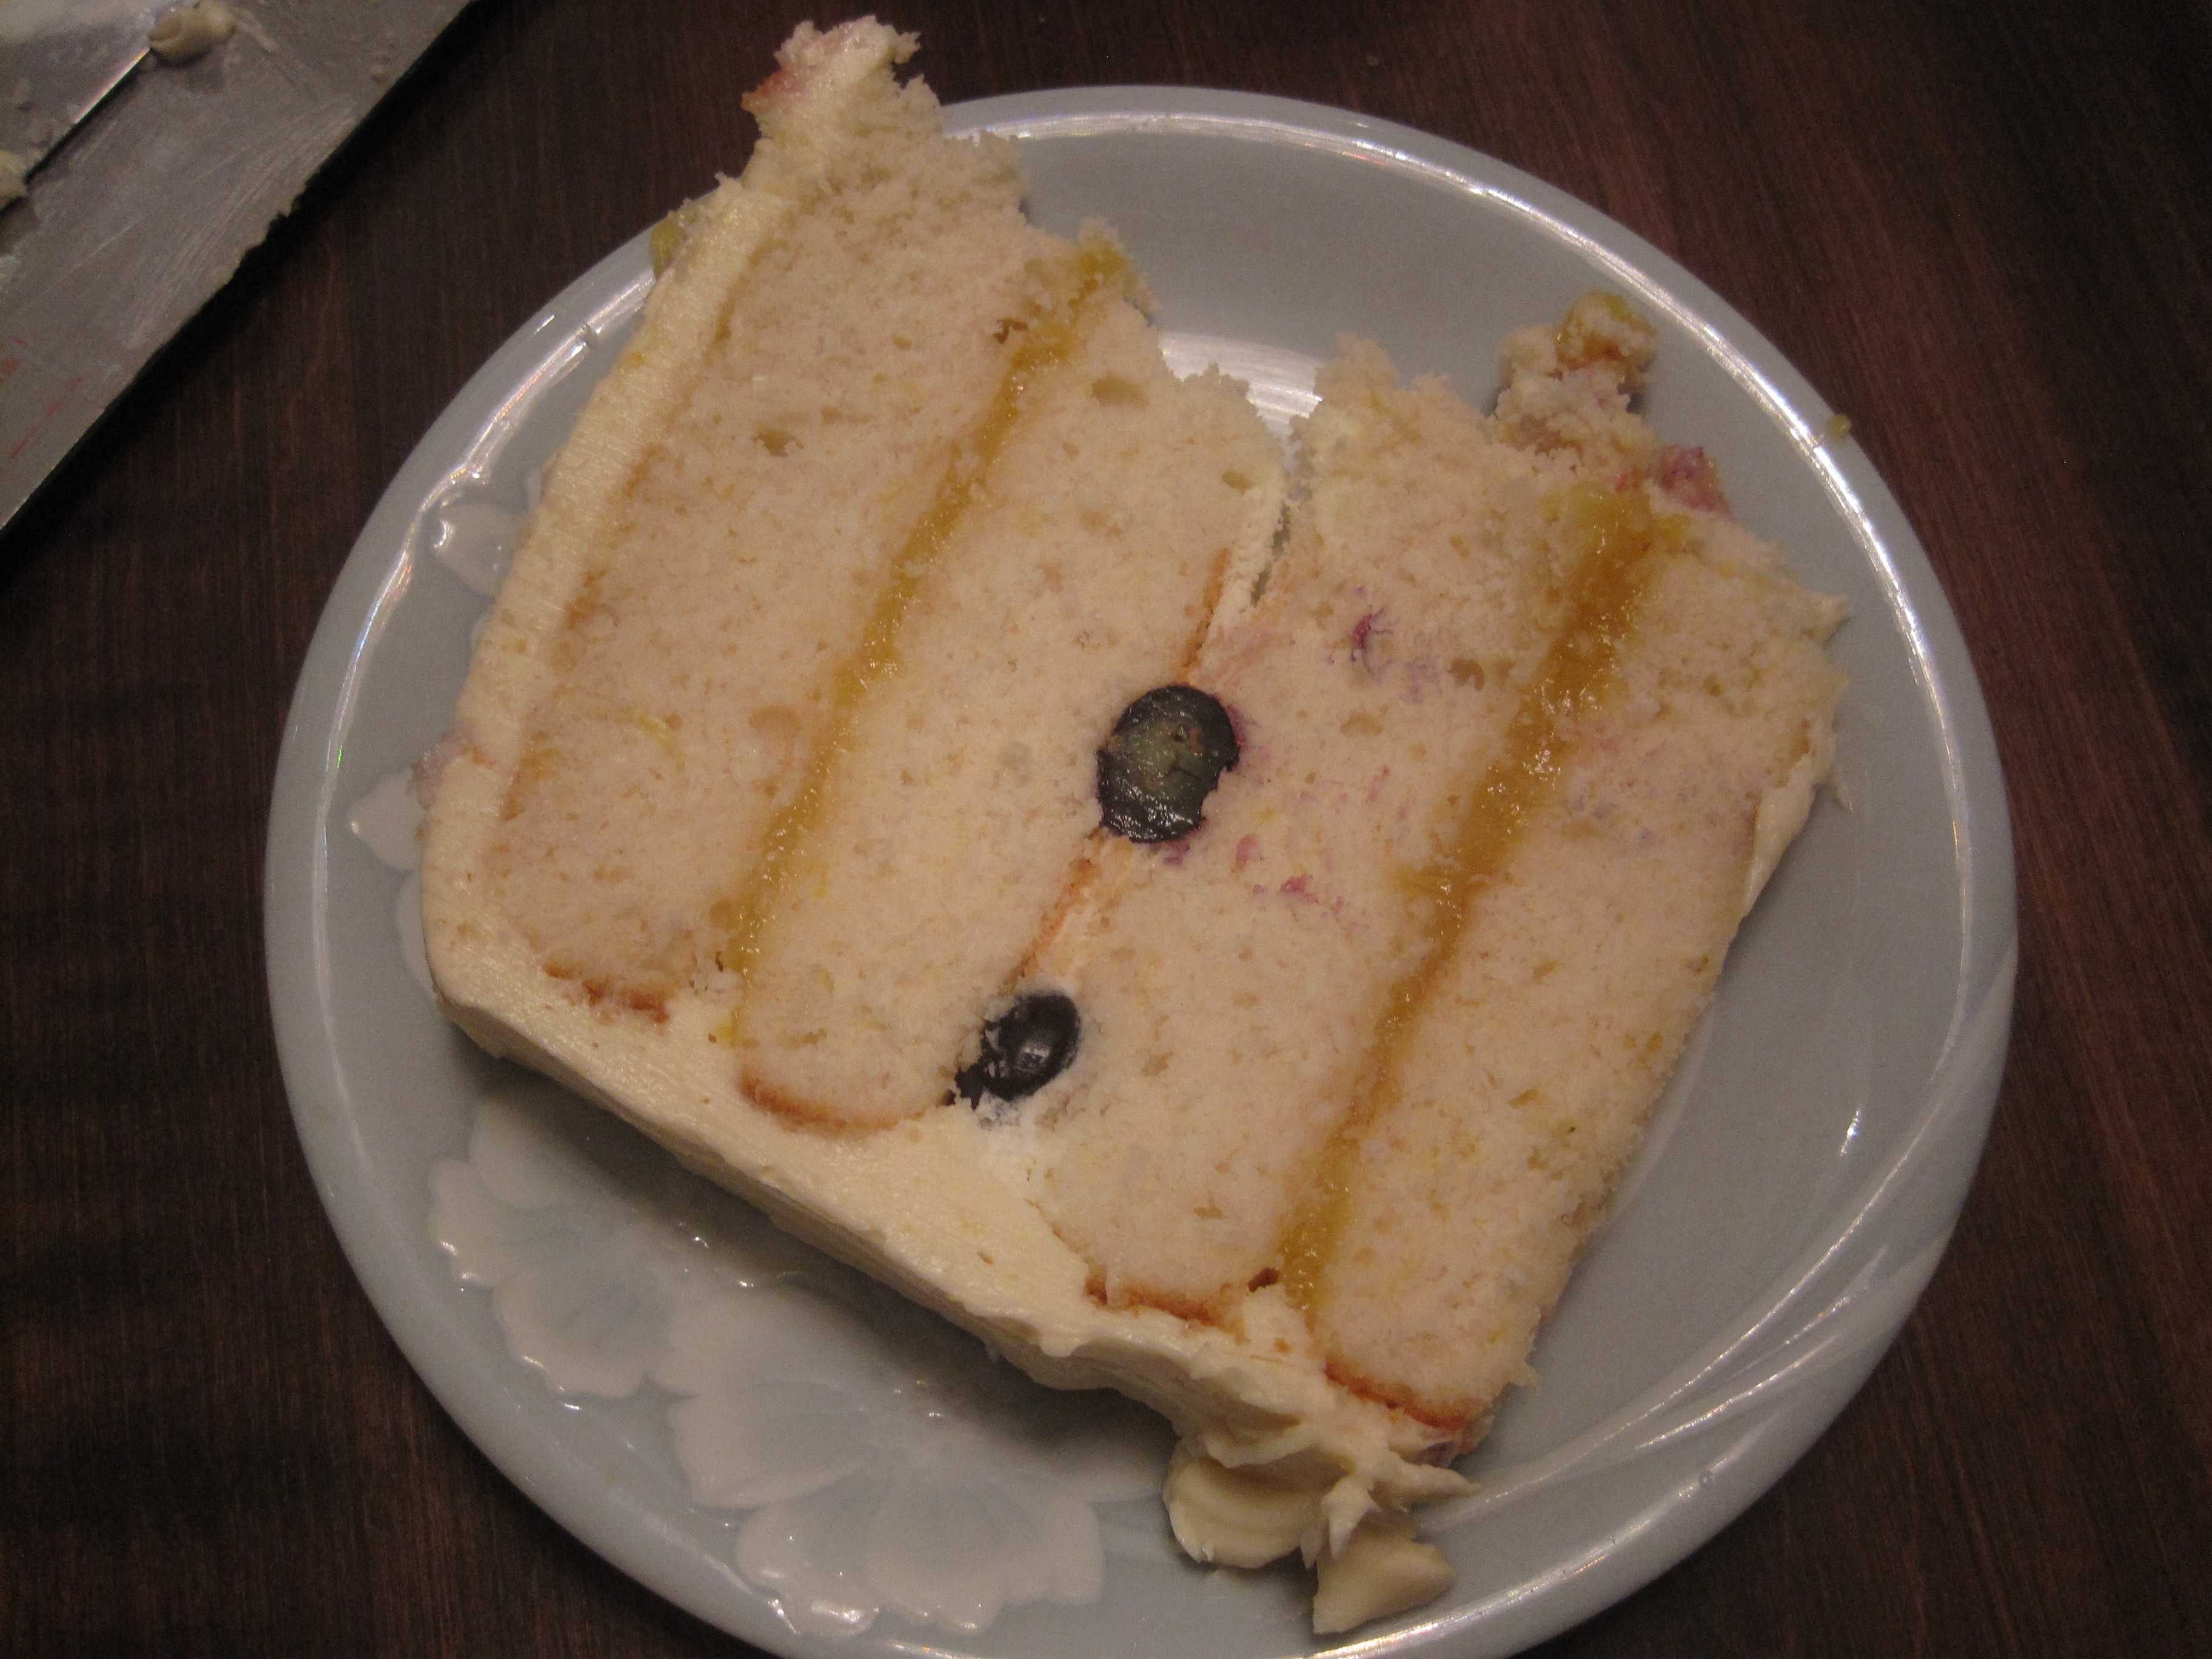
Note that the cake slices hold up very nicely when cut, but this slice didn’t, because it was cut very thinly.
For this recipe, the lemon curd filling works best if it is very thick and, basically, overcooked.
Lemon Layer Cake Recipe
makes one 4-layer, 9 inch round cake
Note: The lemon curd and cake layers may be made days in advance. The frosting and whipped cream should be made just prior to cake assembly. If you have leftover whipped cream, you can freeze it (see here for instructions)!
for the lemon curd filling
For the purpose of this cake, I prefer to use a deliberately overcooked lemon curd that is thicker, drier, and tangier. This way, the lemon flavour becomes really concentrated in a thin spread of filling. Otherwise, the overall cake will be lacking in the necessary lemon and tart flavour. Note that even though this process made my lemon curd slightly bitter, it tasted perfect within the cake (no detectable bitterness). If you prefer to use a standard lemon curd, see my recipe here.
adapted from Ina Garten
1 1/2 very large lemons (preferably organic to avoid pesticides)
1/2 cup granulated white sugar
1/2 stick unsalted butter, softened at room temperature
3 large eggs, yolks only
at least 1/4 cup freshly squeezed lemon juice (from about 1 1/2 very large lemons)
small pinch of kosher salt
Using a vegetable peeler, remove the zest of 1 1/2 lemons (avoid the white parts of the rind). Put the zest and the sugar in a food processor fitted with the steel blade. Pulse until very finely minced and well combined. In a separate bowl, cream the butter until light and fluffy. Then mix in the sugar and zest mixture. Beat in the egg yolks one at a time. Then mix in the lemon juice and salt. The mixture will look curdled at this point, but it will smooth out as you heat it. Pour the mixture into a sauce pot and heat over medium heat until a gentle boil is reached. Reduce the heat slightly to maintain the heat so that if you stopped stirring, the mixture would just start to boil gently. Depending on your stove top, this could require anywhere between low and medium heat. Stir constantly until it is very thick and reduced in volume, between 20 and 30 minutes. It will continue to thicken as it cools. It should taste very lemony and quite tart. Don’t worry if it is slightly bitter too. Set a sheet of syran wrap directly on top of the lemon curd to prevent a film from forming. Then cool and refrigerate until ready for cake assembly, up to 7 days. Note that the lemon curd can be frozen for much longer.
for the lemon vanilla cake
adapted from Sweetapolita’s Perfectly Delightful Vanilla Birthday Cake
Note that for the best and most consistent results, the ingredients for the cake component should be weighed. I made this cake once by weighing the ingredients and once by simply measuring the ingredients. Although both cakes were delicious, weighing the ingredients certainly resulted in a better cake. Considering differences in brands of ingredients, equipment, humidity, and altitude, etc. in each person’s kitchen, I highly recommend weighing your ingredients.
1 1/2 cups + 1/2 teaspoon whole milk, at room temperature
7 large egg whites, at room temperature
1 whole large egg, at room temperature
1 tablespoon pure vanilla extract (Note: For this cake, it is important to use high quality vanilla extract.)
zest of 1 very large lemon (preferably organic) (Note: For this cake, it is very important to use good quality lemons. When choosing lemons, smell them. The peel should smell very lemony.)
3 3/4 cups (430 grams) cake flour, sifted (see cake flour substitutions here)
2 1/4 cups (450 grams) granulated white sugar
1 3/4 tablespoons (25 grams) baking powder
1 scant teaspoon sea salt (6 grams)
1 1/2 sticks (170 grams) unsalted butter, softened at room temperature and cut into cubes
6 tablespoons (85 grams) home rendered lard (see recipe here) or vegetable shortening (preferred brand is Crisco)
Preheat the oven to 350 degrees F (180 degrees C) with the rack in the middle of the oven. Trace the bottom of a 9 inch round cake pan in pencil onto 4 pieces of parchment paper. Cut out all four circles using a pair of scissors. Line the bottom of each of the round cake pans with a parchment paper circle. Grease the cake pans using vegetable oil cooking spray, flour lightly, and set aside. (Note: I used dark, non-stick cake pans. If your cake pans are not non-stick, lightly flour your greased cake pans.) If you are weighing out your ingredients (highly recommended), weigh the bowl of an electric stand mixer and write the weight onto a piece of paper.
In a medium sized bowl, mix together the following wet ingredients using a wooden spoon: 1/2 cup of the milk, egg whites, whole egg, and vanilla extract. Set aside.
In the bowl of an electric stand mixer, sift the cake flour twice. Add the sugar, baking powder, and salt. Using the paddle attachment, stir the dry ingredients on the lowest speed (stir setting) for up to 30 seconds. Add the butter and lard/shortening and continue mixing on low speed for 30 more seconds. With the motor running, add the remaining milk gradually. Once the batter is moistened, increase the speed to medium and mix for 1 1/2 minutes. Do not overbeat. Scrape down the sides of the bowl. Turn the mixer on to medium speed and add the mixture of liquid ingredients in 3 separate batches, beating for up to 20 seconds after each addition. Add the lemon zest and stir until just mixed through.
If you are weighing your ingredients (highly recommended), weigh the bowl with the batter in it. Take that number, minus the weight of the empty bowl that you wrote down earlier, and then divide it by 4. The final number is how much batter (it should be approximately 445 grams) you should pour into each of your 4 cake pans. Place a prepared cake pan onto your scale, tare the balance (so that it weighs 0 grams on your electronic scale), and add the exact amount of cake batter to the cake pan. Repeat this step for each of your remaining 3 cake pans. Using an offset spatula or a rubber spatula, spread the batter evenly. Then push the batter slightly from the middle towards the edges; this will help prevent doming of the cake when it has finished baking.
If you are not weighing your ingredients, pour 1/4 of your cake batter (approximately 2 cups) into each of your 4 prepared cake pans. Using an offset spatula or a rubber spatula, spread the batter evenly. Then push the batter slightly from the middle towards the edges; this will help prevent doming of the cake when it has finished baking.
Bake the cake layers, two at a time with 2 inches of space between them until a toothpick inserted in the centre comes out clean or with just a few crumbs attached to it. This will take between 17 to 20 minutes. It is very important not to overbake this cake. Halfway through the baking time, gently rotate the cake pans so that the sides that were closest to the oven walls are moved to the middle of the oven.
Place the cake pans onto wire racks and cool for 10 minutes before running a small metal spatula along the edge of the cake and inverting the cake onto greased (using softened butter or vegetable oil) cooling racks. Carefully turn the cakes right side up again, using a clean oven mitt or a large plate, and cool completely on the wire rack. Meanwhile, wash and dry the 2 cake pans (if you don’t own four 9 inch round cake pans), prepare them as described above, and bake the remaining 2 cake layers.
If assembling the cake right away, make the whipped lemon vanilla frosting (see recipe below) while you are waiting for the cake layers to cool completely.
If you are making the cake layers in advance, the cooled cake layers can be wrapped tightly in syran wrap, aluminum foil, and then placed in a freezer bag with as much of the air squeezed out of it as possible. The cake layers may be stored in the refrigerator for up to 5 days or frozen for up to 2 months. But this cake is best enjoyed within the first 2 days of baking. Although the cake layers can be baked in advance, the whipped lemon vanilla frosting and whipped cream should be made just prior to cake assembly.
for the whipped cream and fresh blueberry layer
1/2 cup heavy whipping cream (35%)
1/2 tablespoon granulated white sugar
2 pints fresh blueberries (Note: Make sure that they are dry before use.)
In the bowl of an electric stand mixer fitted with the whisk attachment, whip the whipping cream and sugar on the highest speed until stiff peaks are achieved. Keep chilled in the refrigerator right up until you are ready for cake assembly.
for the whipped lemon vanilla frosting
Note that this frosting should be made just prior to cake assembly and used right away to frost the cake. Once the cake has been frosted, it will keep well for a few days in the refrigerator.
2 1/2 cups (5 sticks) unsalted butter, softened at room temperature and cut into cubes
5 cups icing sugar (Note: If you prefer a sweeter frosting, add an extra 1/4 cup or more to taste)
5 tablespoons milk
1 tablespoon pure vanila extract (Note: For this recipe, it is important to use high quality vanilla extract.)
zest of 1 very large lemon (preferably organic) (Note: For this cake, it is very important to use good quality lemons. When choosing lemons, smell them. The peel should smell very lemony.)
pinch or two of sea salt
In the bowl of an electric stand mixer fitted with the paddle attachment, beat/whip the butter on medium speed (setting 4) for 8 minutes until the butter becomes very pale and creamy. Sift the icing sugar into the bowl, add the remaining ingredients, and beat on low speed (stir setting) for 1 minute. Then beat/whip on medium speed for 6 minutes, until the frosting is very light, smooth, and fluffy.
for cake assembly
Defrost any frozen components overnight or for up to 1 day in the refrigerator.
Using a sharp and long serrated knife, trim off any doming from the top of your cake layers. Spread a small dollop of your frosting on the middle of your cake board/cake stand/plate (whatever you will be setting your cake on). This will prevent your cake from sliding off during transport. Note: This is a very heavy cake, so if you are using a cake board, be sure not to use the flimsy cardboard ones.
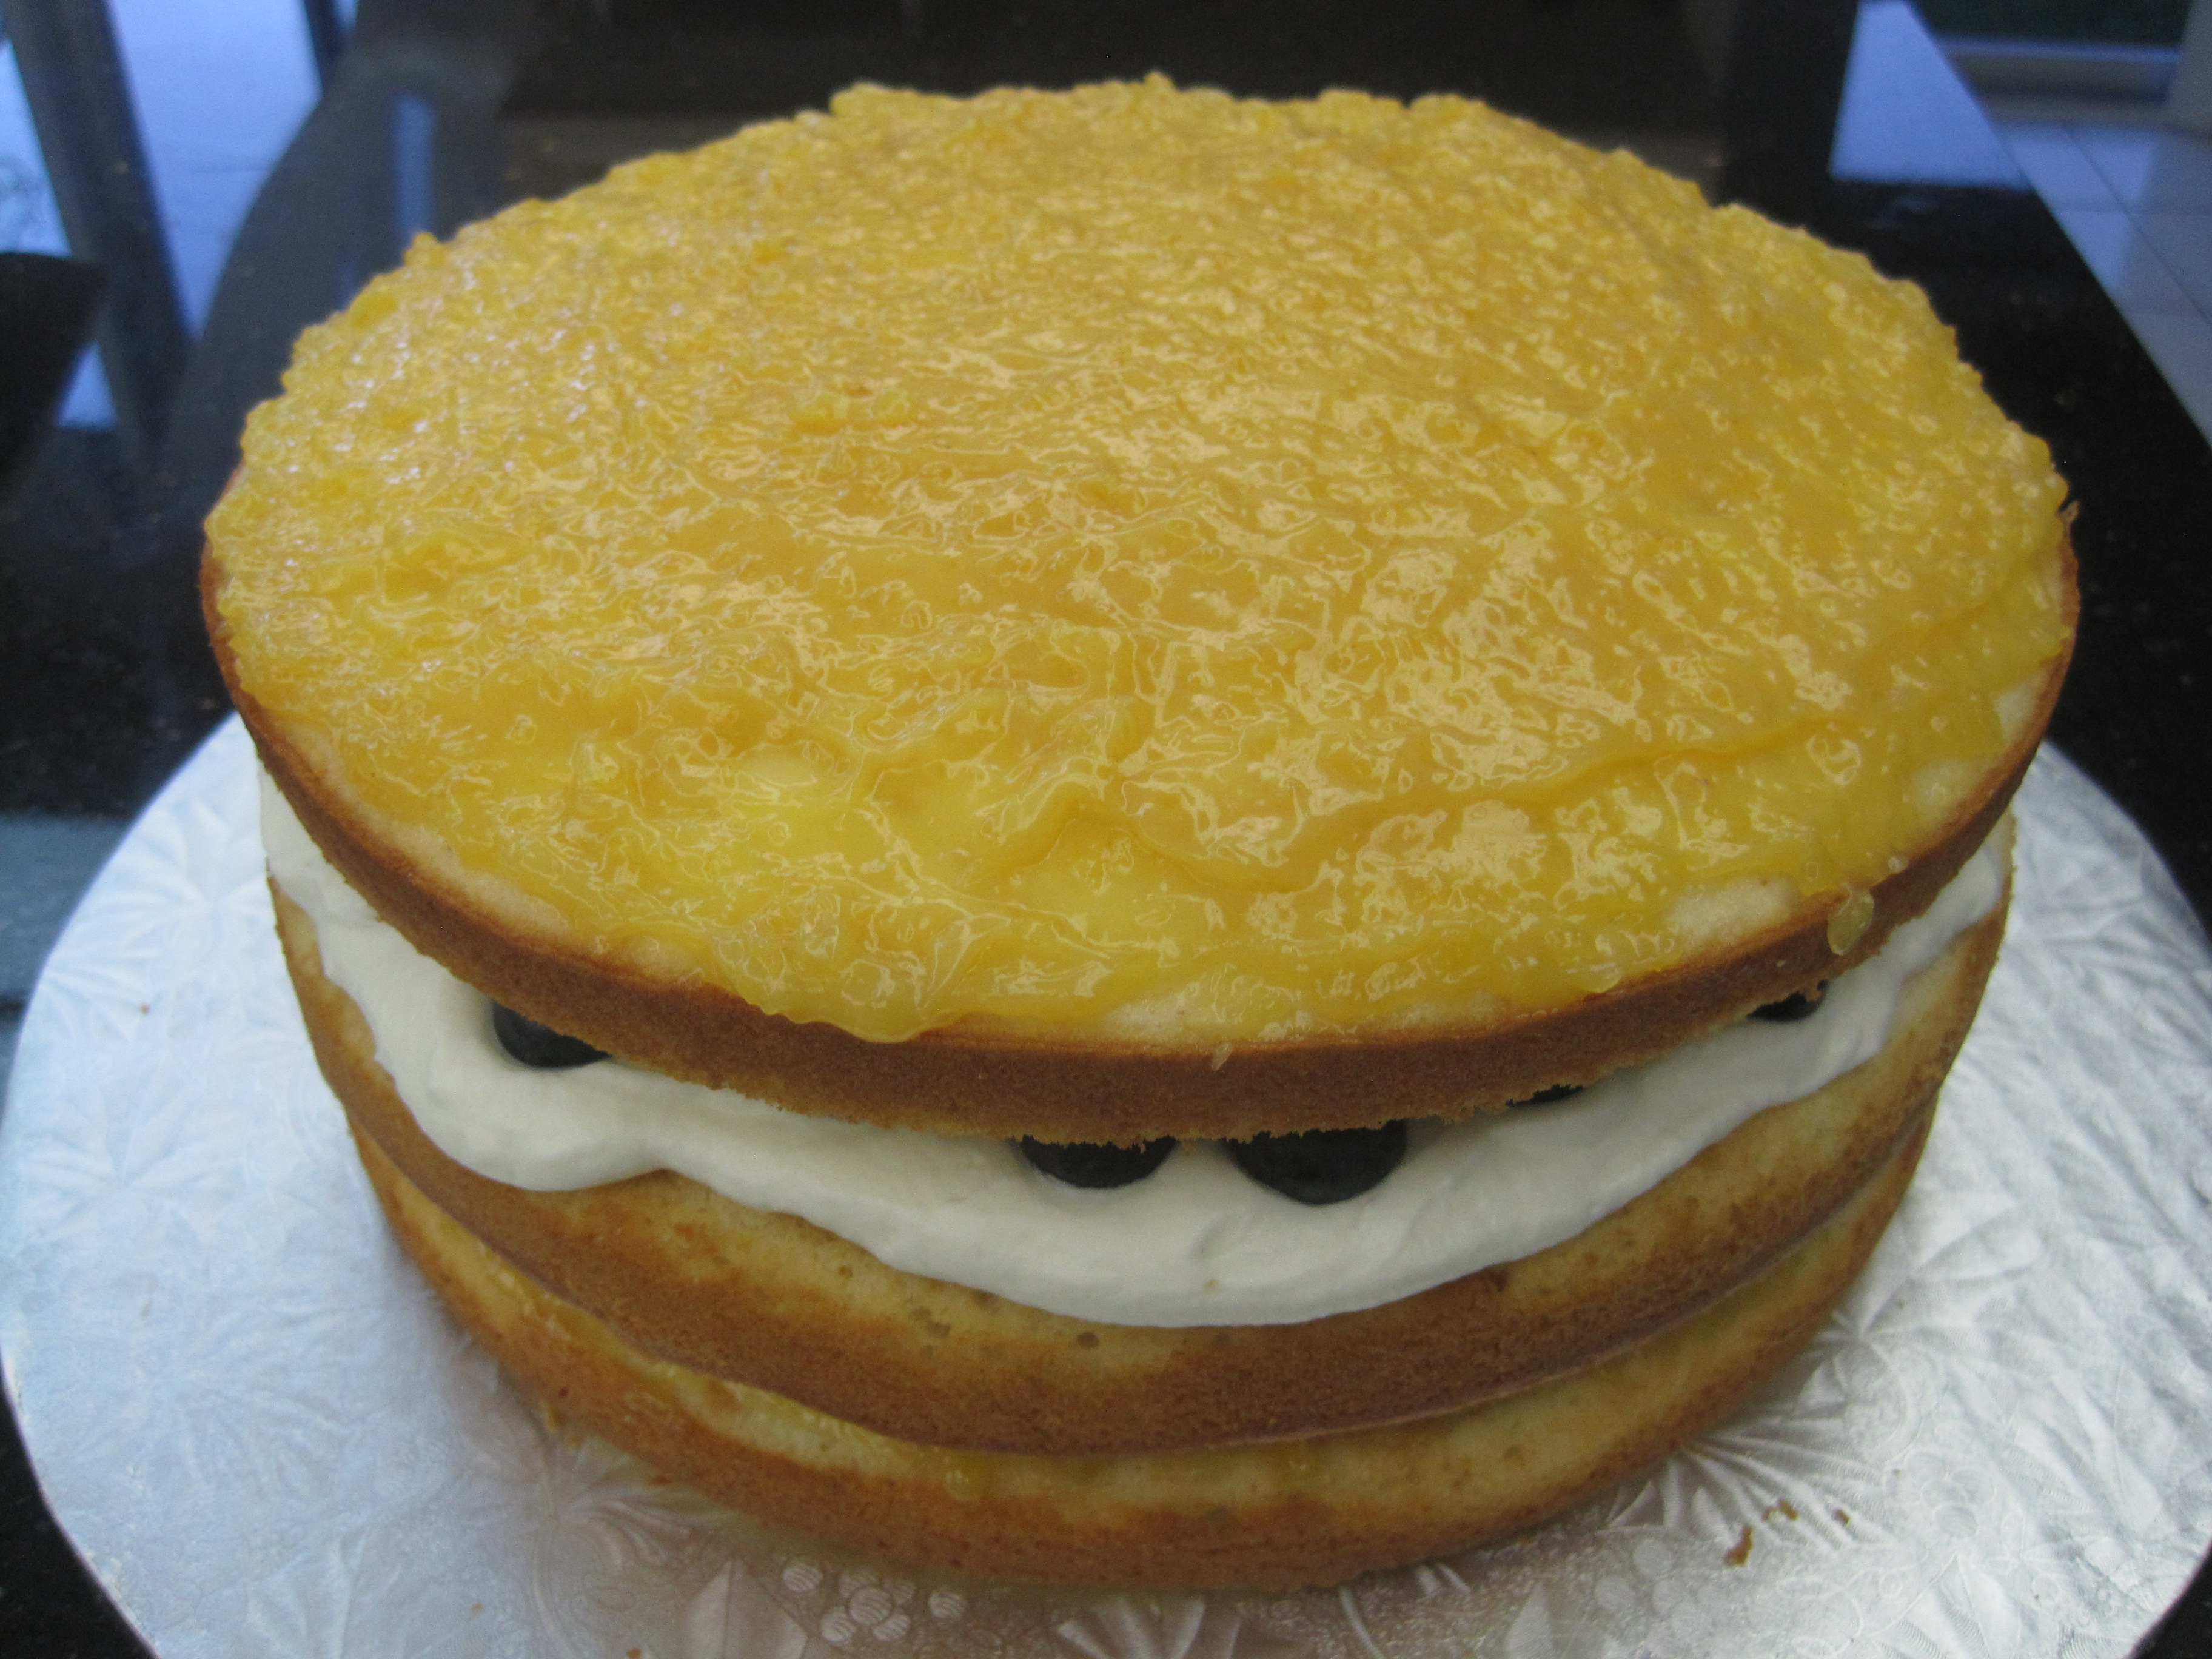
Place one cake layer on top of your cake board facing up or, in other words, with the right side up (ie. the side that was trimmed will be facing up and the side that was touching the bottom of the cake pan during baking will now be touching the cake board). Spread half of the lemon curd evenly all over the top of the cake layer. The layer will seem thin, but the flavour will be bold enough to contrast and compliment the rich cake and sweet frosting. You could use an offset spatula or a rubber spatula to do this.
Place the second cake layer face up on top of the first layer and lemon curd filling. Spread the whipping cream evenly on top of this cake layer, but leave half an inch of cake uncovered along the edge. Place the blueberries into the whipped cream in a single layer. The more blueberries, the better. The first time I made this cake, I only used 1 pint of blueberries and there were not enough blueberries in each slice of cake.
Place the third cake layer face up on top of the whipped cream and blueberries. Spread the remaining lemon curd evenly all over the top of the cake layer. Then place the fourth and final cake layer, face down this time, on the top of the cake. The flat and smooth bottom of the last cake layer should now be facing up.
Applying a crumb coat will make it easier to frost the cake as it will prevent cake crumbs from loosening and mixing in with your frosting. To do this, start by placing a generous amount of the whipped frosting on to the top of the cake. Using an offset spatula, spread the frosting evenly across the top and down the sides of the cake. Add more frosting as required. Once you have a thin layer of frosting covering the entire cake, chill it uncovered for 30 minutes or until the frosting is set and slightly firm to the touch.
Use the remaining frosting to decorate the cake however you’d like. Hopefully your cake will look better than mine did. 🙂 One of these days, I’ll buy some patterned cake edge scrapers.
Store the cake covered in the refrigerator for up to 5 days. Be sure to allow the cake to come to room temperature prior to serving or else the frosting will be too firm.
