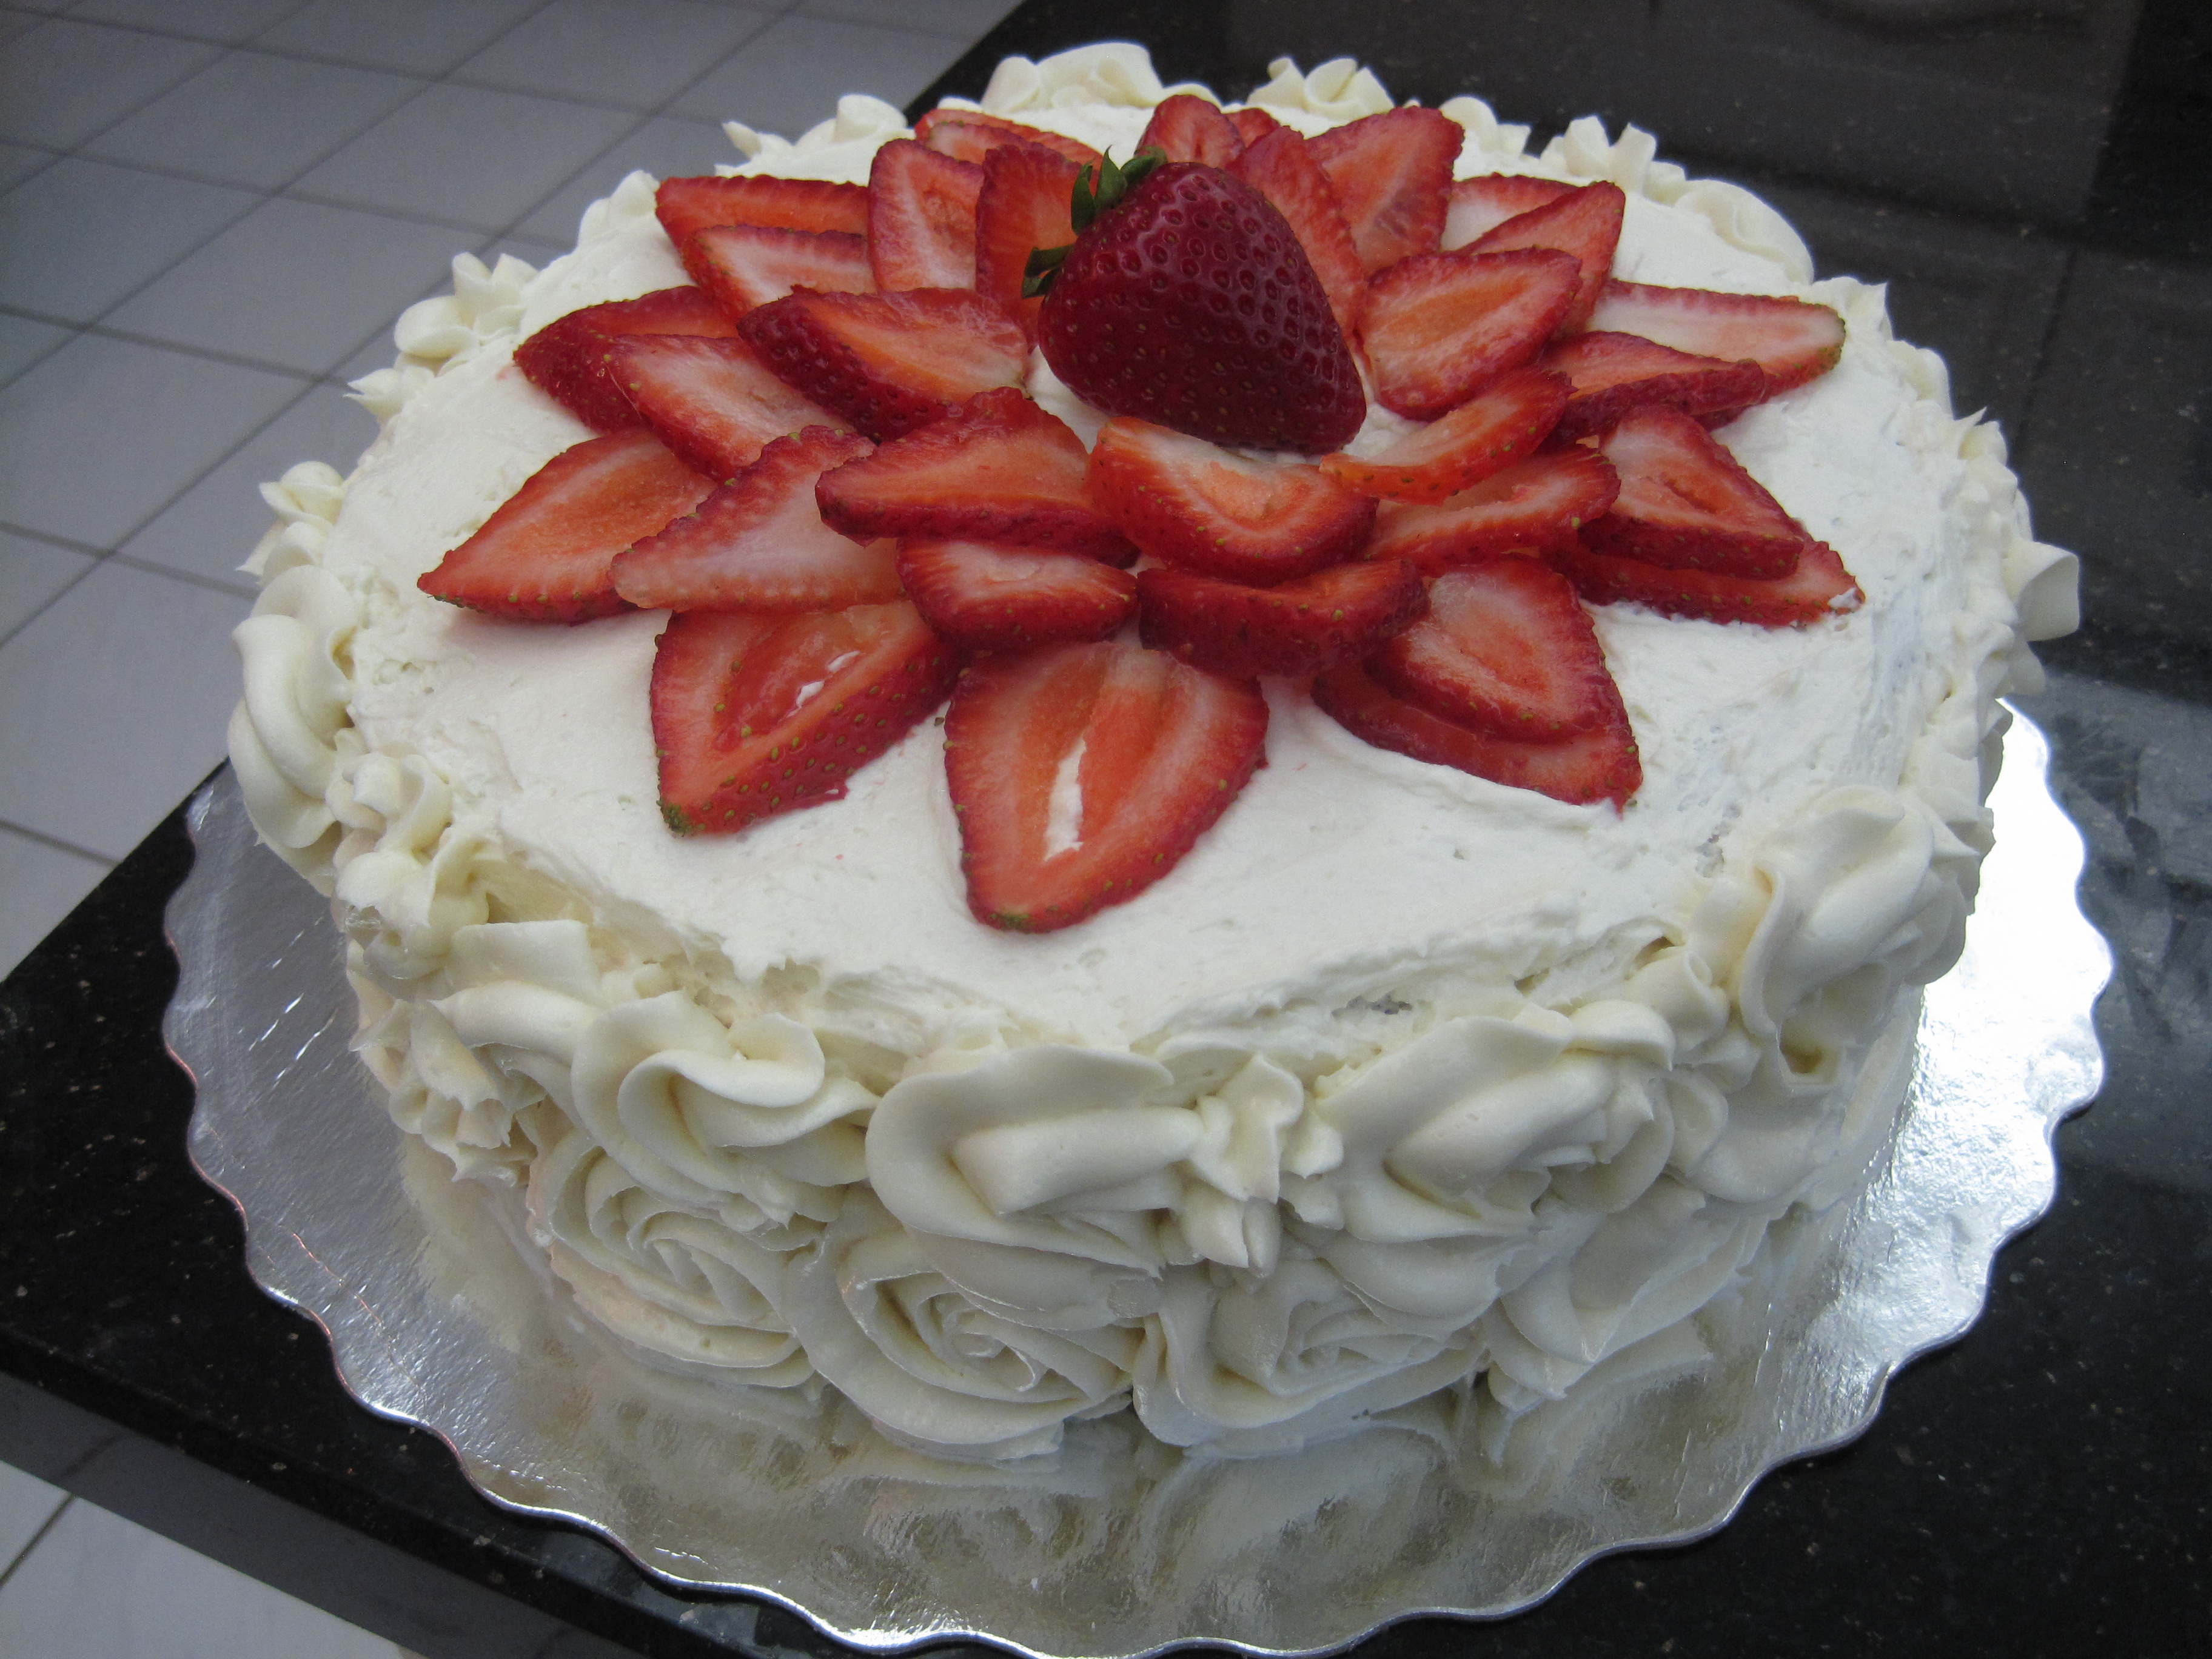
After incredible success with turning Sweetapolita’s vanilla birthday cake into a lemon layer cake (recipe here), I knew that I had to try her fluffy vanilla cake with whipped vanilla frosting as originally intended. Especially after she validated my preference for homemade vanilla cake that resembles boxed cake mix! But since I only like vanilla cake that has fruit in it, I couldn’t help but add some fresh strawberries. The tartness of the strawberries contrasted the not-too-sweet vanilla frosting beautifully. You could always omit the strawberries and whipped cream filling. I made this for my sister’s surprise 28th birthday party. In my opinion, it was quite ugly up close. John said that it was even uglier than the cake I made for his birthday (see photo here), haha. 🙂 Personally, I like the lemon cake more (probably because it uses lard in the cake batter), but the flavour and texture of this strawberry vanilla cake won’t disappoint, as long as you don’t overbake it.
Strawberry and Vanilla Cake Recipe
makes one 2-layer, 9-inch round cake; adapted from Sweetapolita’s Fluffy Vanilla Cake
Note: If you omit the strawberries and whipped cream, this recipe makes a delicious plain vanilla cake with whipped vanilla frosting.
for the cake
Note that for the best and most consistent results, the ingredients for the cake component should be weighed. I made this cake once by weighing the ingredients and once by simply measuring the ingredients. Although both cakes were delicious, weighing the ingredients certainly resulted in a better cake. Considering differences in brands of ingredients, equipment, humidity, and altitude, etc. in each person’s kitchen, I highly recommend weighing your ingredients.
12 tablespoons (170 grams) unsalted butter, cold straight from the refrigerator and cut into 24 even pieces
5 large egg whites (150 grams), at room temperature
1 whole egg, at room temperature
1 cup whole milk, at room temperature (Note: I only had skim milk, so I mixed the skim milk with a little bit of leftover heavy whipping cream.)
2 1/4 teaspoons pure vanilla extract (Note: I used Mexican vanilla extract for a subtly different flavour. It is important to use a high quality vanilla extract in this recipe.)
3 cups (345 grams) cake flour (see my cake flour substitution recipe here)
2 cups (400 grams) granulated white sugar
1 tablespoon + 1 teaspoon (17 grams) baking powder
3/4 teaspoon (5 grams) sea salt
Preheat the oven to 350 degrees F (180 degrees C) with the rack in the middle of the oven. Trace the bottom of a 9 inch round cake pan in pencil onto 2 pieces of parchment paper. Cut out the circles using a pair of scissors. Line the bottom of each of the 2 round cake pans with a parchment paper circle. Grease the cake pans using vegetable oil cooking spray, flour lightly, and set aside. (Note: I used dark, non-stick cake pans. If your cake pans are not non-stick, lightly flour your greased cake pans.) If you are weighing out your ingredients (highly recommended), weigh the bowl of an electric stand mixer and write the weight onto a piece of paper.
In a medium sized bowl, mix together the following wet ingredients using a wooden spoon: the egg whites, whole egg, 1/4 cup of the milk, and vanilla extract. Set aside.
In the bowl of an electric stand mixer, sift the cake flour twice. Add the sugar, baking powder, and salt. Using the paddle attachment, stir the dry ingredients on the lowest speed (stir setting) for up to 30 seconds. With the motor still running, add the butter one piece at a time, beating for approximately 10 seconds after each addition. Mix until the mixture has a fine, crumbly texture. Then add the remaining milk gradually and continue to mix on low speed for 5 minutes. Scrape down the sides of the bowl. Add the egg mixture in 3 separate batches, mixing on the lowest speed until just combined after each addition. Mix until the batter is light and fluffy, up to 4 minutes. You may want to use a rubber spatula to fold the batter once or twice to make sure that even the contents on the very bottom of the bowl have been incorporated well.
If you are weighing your ingredients (highly recommended), weigh the bowl with the batter in it. Take that number, minus the weight of the empty bowl that you wrote down earlier, and then divide it by 2. The final number is how much batter you should pour into each of your 2 cake pans. Place a prepared cake pan onto your scale, tare the balance (so that it weighs 0 grams on your electronic scale), and add the exact amount of cake batter to the cake pan. Repeat this step for the remaining cake pan. Using an offset spatula or a rubber spatula, spread the batter evenly. Then push the batter slightly from the middle towards the edges; this will help prevent doming of the cake when it has finished baking.
If you are not weighing your ingredients, pour half of your cake batter into each of your 2 prepared cake pans. Using an offset spatula or a rubber spatula, spread the batter evenly. Then push the batter slightly from the middle towards the edges; this will help prevent doming of the cake when it has finished baking.
Bake the cake layers with 2 inches of space between them until a toothpick inserted in the centre comes out clean or with just a few crumbs attached to it (preferred). This will take up to 30 minutes. Start checking at 20 minutes. It is very important not to overbake the cake layers. Halfway through the baking time, gently rotate the cake pans so that the sides that were closest to the oven walls are moved to the middle of the oven.
Place the cake pans onto wire racks and cool for 10 minutes before running a small metal spatula along the edge of the cake and inverting the cake onto greased (using softened butter or vegetable oil) cooling racks. Carefully turn the cakes right side up again, using a clean oven mitt or a large plate, and cool completely on the wire rack.
If assembling the cake right away, make the whipped vanilla frosting (see recipe below) and whipped cream, if using, (see recipe below) while you are waiting for the cake layers to cool completely.
If you are making the cake layers in advance, the cooled cake layers can be wrapped tightly in syran wrap, aluminum foil, and then placed in a freezer bag with as much of the air squeezed out of it as possible. The cake layers may be stored in the refrigerator for up to 5 days or frozen for up to 2 months. But this cake is best enjoyed when eaten on the same day that it was baked. Although the cake layers can be baked in advance, the whipped lemon vanilla frosting and whipped cream should be made just prior to cake assembly.
for the whipped cream and fresh strawberries layer
Note: You could omit the strawberries and whipped cream and simply use the whipped vanilla frosting as the filling. Alternatively, you could keep the strawberries, but replace the whipped cream filling with the whipped vanilla frosting. If you have leftover whipped cream, you can freeze it (see here for instructions)!
1/2 cup heavy whipping cream (35%)
1/2 tablespoon granulated white sugar
2 pounds of fresh strawberries (some reserved for topping the cake)
In the bowl of an electric stand mixer fitted with the whisk attachment, whip the whipping cream and sugar on the highest speed until stiff peaks are achieved. Keep chilled in the refrigerator right up until you are ready for cake assembly. Slice enough of the strawberries, thinly, to be able to cover the entire top of one cake layer. Reserve the remaining strawberries for decorating the top of the cake (i.e. left whole or sliced).
for the whipped vanilla frosting
adapted from Sweetapolita’s Whipped Vanilla Bean Frosting
3 sticks + 2 tablespoons (375 grams) unsalted butter, softened at room temperature and cut into cubes
3 cups (475 grams) icing sugar, sifted
3 tablespoons milk
1 vanilla bean, scraped + 1/2 teaspoon of pure vanilla extract or 1 1/2 teaspoons of pure vanilla extract (Note: I used Mexican vanilla extract for a subtly different flavour. It is important to use a high quality vanilla extract in this recipe.)
small pinch of sea salt
In the bowl of an electric stand mixer fitted with the paddle attachment, beat the butter until it becomes very pale and creamy, up to 8 minutes on medium speed (setting 4). Add the remaining ingredients and mix on the lowest speed for 1 minute. Then beat on medium speed for 6 minutes. The frosting should be very light, creamy, and fluffy. It is best if this frosting is used to frost the cake immediately after preparation. However, once the cake has been frosted, it will keep well for a few days in the refrigerator.
for cake assembly
Defrost any frozen cake layers overnight or for up to 1 day in the refrigerator.
Using a sharp and long serrated knife, trim off any doming from the top of your cake layers. Spread a small dollop of your frosting on the middle of your cake board/cake stand/plate (whatever you will be setting your cake on). This will prevent your cake from sliding off during transport.
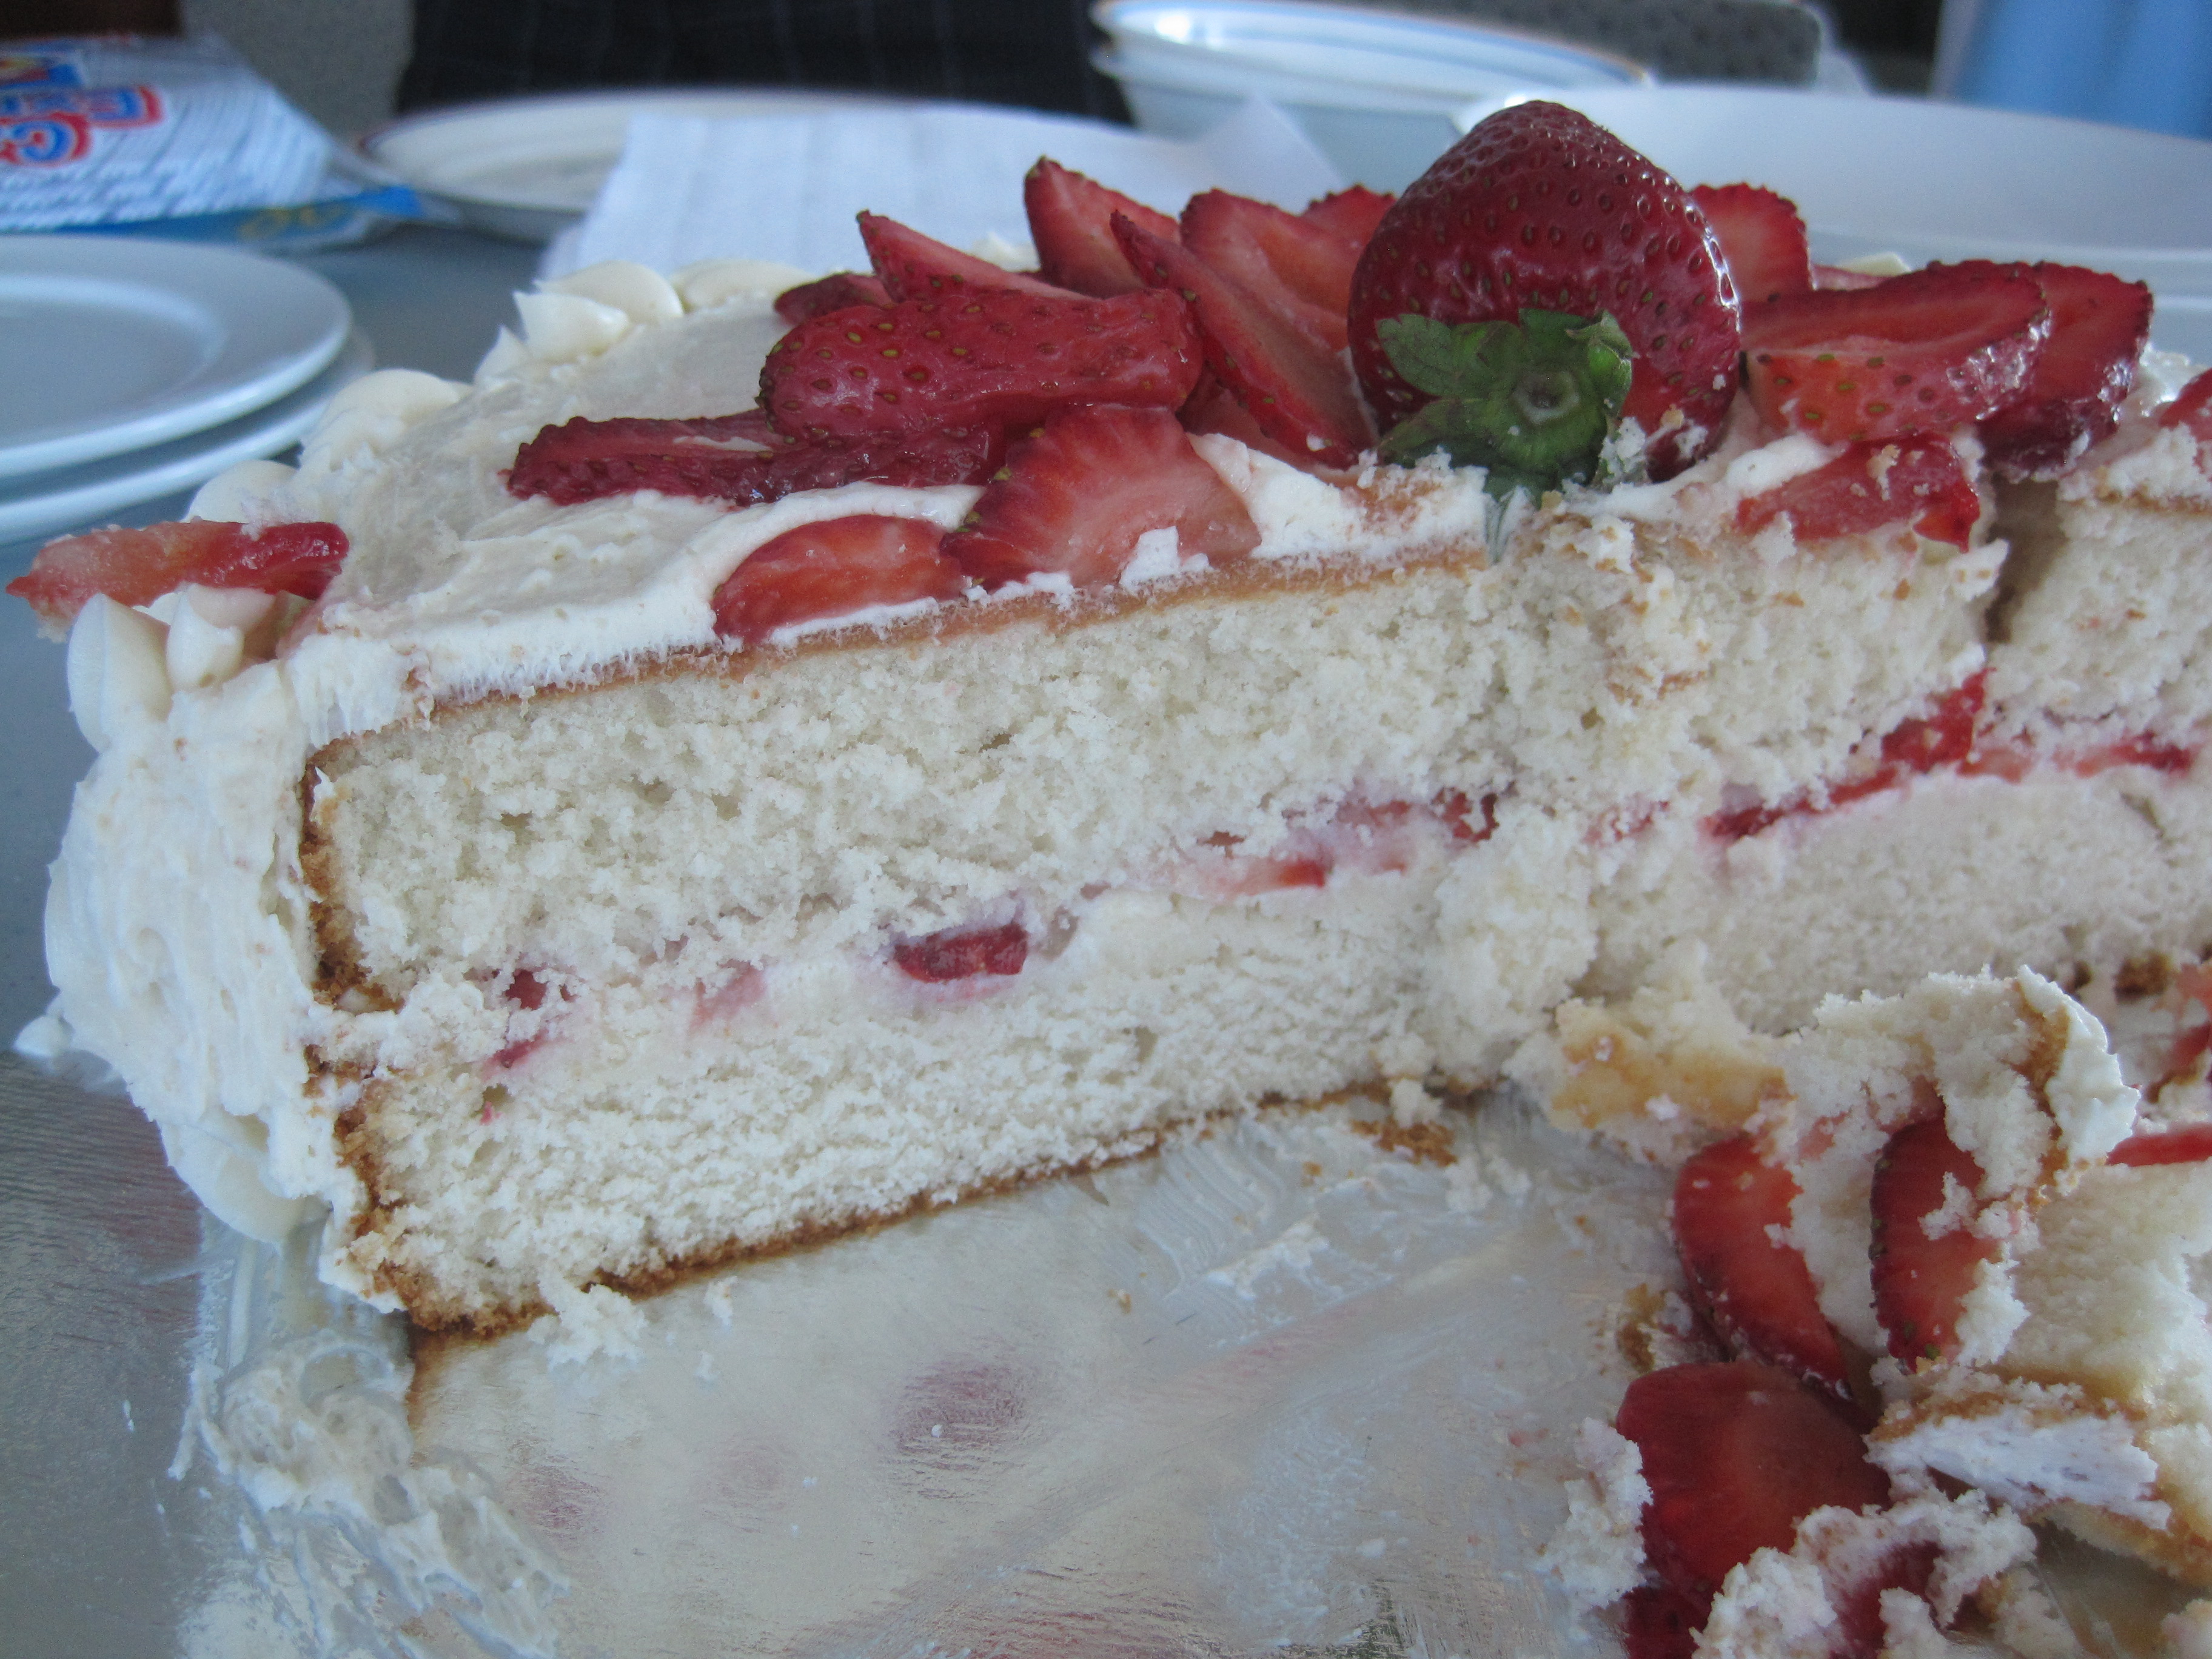
Place one cake layer on top of your cake board facing up or, in other words, with the right side up (ie. the side that was trimmed will be facing up and the side that was touching the bottom of the cake pan during baking will now be touching the cake board). Spread the whipping cream evenly on top of this cake layer, but leave half an inch of cake uncovered along the edge. Or, if you are omitting the whipped cream, apply a thin layer of the whipped vanilla frosting over the entire top of the cake layer. This should use approximately 1 cup of the frosting. Place the thinly sliced strawberries onto the whipped cream or frosting in a single layer. You want to be able to cover the entire cake layer with strawberries.
Place the second cake layer, face down this time, on the top of the cake. The flat and smooth bottom of the last cake layer should now be facing up.
Applying a crumb coat will make it easier to frost the cake as it will prevent cake crumbs from loosening and mixing in with your frosting. To do this, start by placing a generous amount of the whipped frosting on to the top of the cake. Using an offset spatula, spread the frosting evenly across the top and down the sides of the cake. Add more frosting as required. Once you have a thin layer of frosting covering the entire cake, chill it uncovered for 30 minutes or until the frosting is set and slightly firm to the touch.
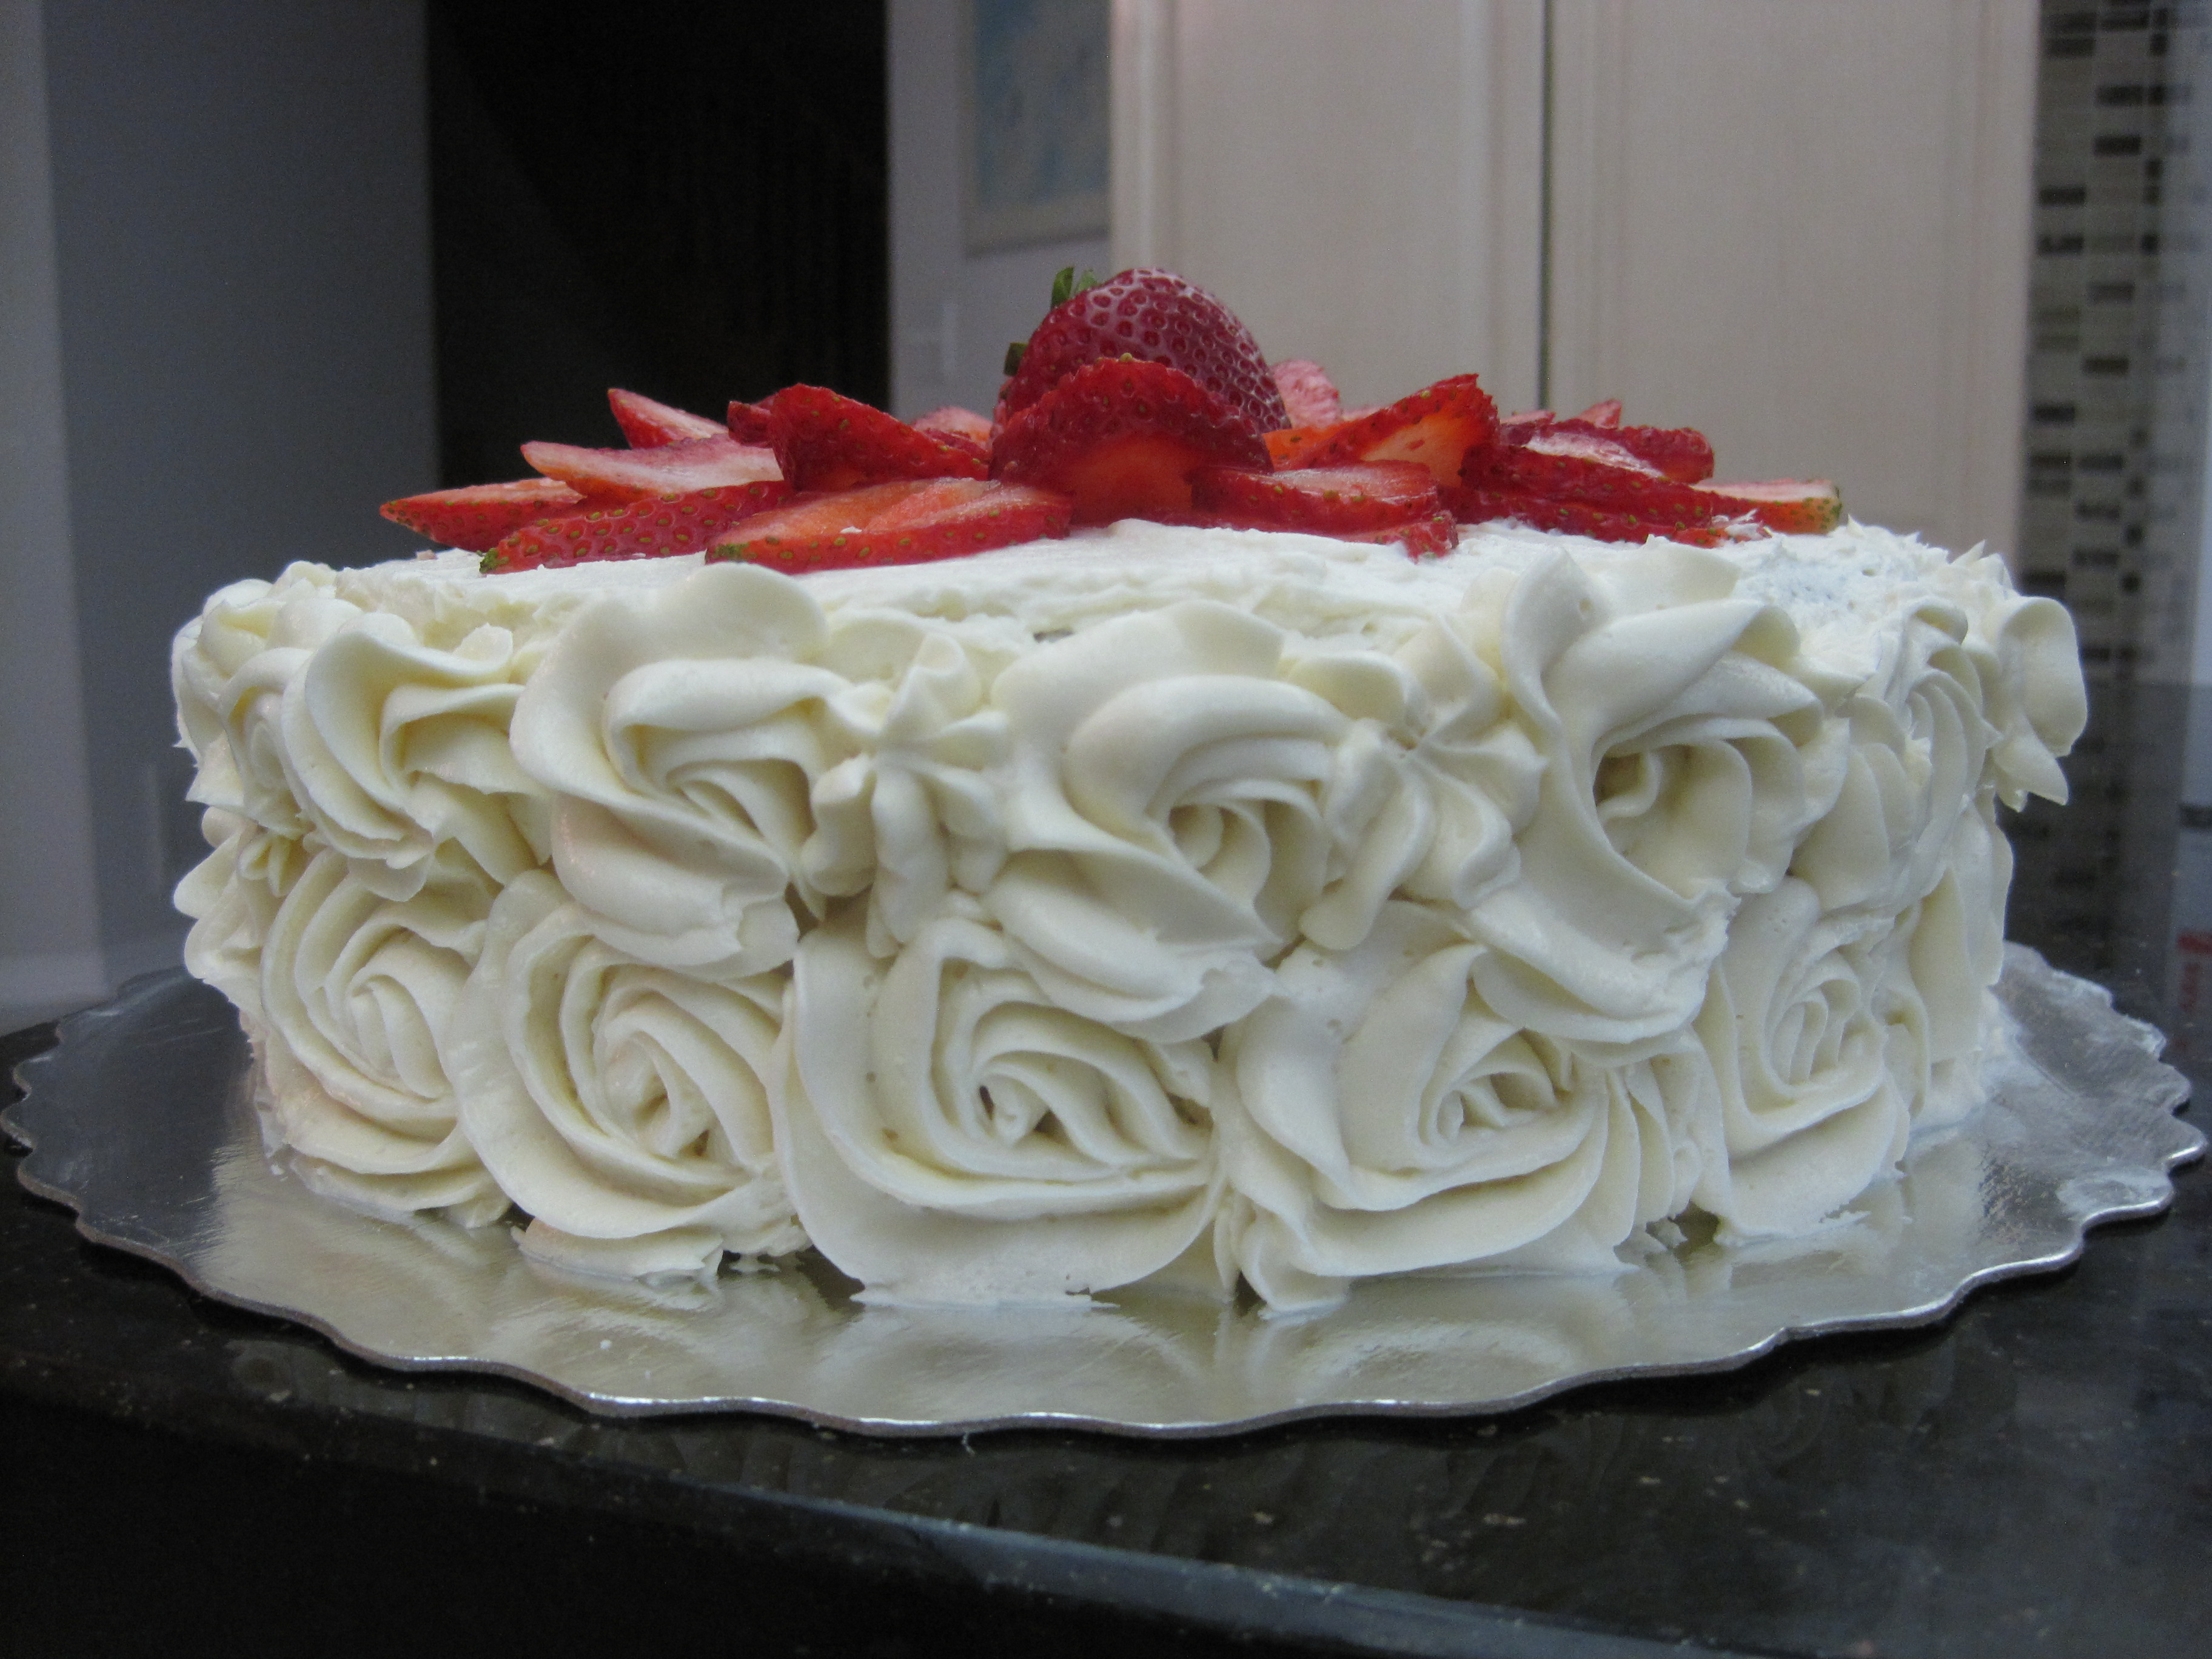
Use the remaining frosting and strawberries to decorate the cake however you’d like. Hopefully your cake will look better than mine did. 🙂 Store the cake covered in the refrigerator for up to 4 days if using strawberries and for up to 5 days if not. Be sure to allow the cake to come to room temperature prior to serving or else the frosting will be too firm.

[…] here). For contrasting height, I also served a two-layer strawberry and vanilla cake (recipe here) on a basic cake […]